| Don't like the ads? Then create an account! Users with accounts have more options than anonymous users. |
Difference between revisions of "Gallery:Hyrule Warriors: Definitive Edition"
From Triforce Wiki, a The Legend of Zelda wiki
Jump to navigationJump to search
(Screencap) |
|||
| Line 1: | Line 1: | ||
{{italic title}} | |||
{{more images}} | {{more images}} | ||
This is a gallery of images pertaining to ''[[Hyrule Warriors: Definitive Edition]]''. For images created for or derived from its previous versions, see [[Gallery:Hyrule Warriors|Gallery:''Hyrule Warriors'']] and [[Gallery:Hyrule Warriors Legends|Gallery:''Hyrule Warriors Legends'']]. | This is a gallery of images pertaining to ''[[Hyrule Warriors: Definitive Edition]]''. For images created for or derived from its previous versions, see [[Gallery:Hyrule Warriors|Gallery:''Hyrule Warriors'']] and [[Gallery:Hyrule Warriors Legends|Gallery:''Hyrule Warriors Legends'']]. | ||
| Line 13: | Line 14: | ||
HWDE Fairy art.png|Light [[fairy]] | HWDE Fairy art.png|Light [[fairy]] | ||
HWDE group art.jpg|Group artwork | HWDE group art.jpg|Group artwork | ||
</gallery> | |||
==Screenshots== | |||
<gallery> | |||
HW Fierce Deity Link defeating Link.jpg|[[Fierce Deity Link]] finishing off [[Link]] | |||
</gallery> | </gallery> | ||
Latest revision as of 13:19, March 13, 2022
It has been requested that additional images be uploaded for this article. Remove this only when the image(s) have been uploaded for this article.
This is a gallery of images pertaining to Hyrule Warriors: Definitive Edition. For images created for or derived from its previous versions, see Gallery:Hyrule Warriors and Gallery:Hyrule Warriors Legends.
Logo[edit]

Traditional Chinese logo
Artwork[edit]


Screenshots[edit]
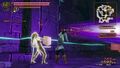
Fierce Deity Link finishing off Link
