| Don't like the ads? Then create an account! Users with accounts have more options than anonymous users. |
Triforce Chart
| Triforce Chart | |
|---|---|
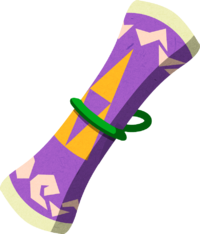
 Artwork from The Legend of Zelda: The Wind Waker | |
| First appearance | The Legend of Zelda: The Wind Waker |
| Latest appearance | The Legend of Zelda: The Wind Waker HD |
| Location(s) | All across Great Sea |
| Effect | Reveals the location of the Triforce Shards |

- “You got a Triforce Chart! You can't read it yourself, so you'll have to get it deciphered somewhere.”
- – In-game description
The Triforce Charts are a type of Treasure Chart that appear in The Legend of Zelda: The Wind Waker and its Wii U remaster, The Legend of Zelda: The Wind Waker HD. Each chart reveals the location of one of the Triforce Shards, which are required for Link to re-enter Hyrule. In the Nintendo GameCube version, Link has to collect eight Triforce Charts, but in the Wii U version, he only has to obtain three.
Link cannot make out the location by himself, and therefore, he must visit Tingle Island to have Tingle decipher the location for him. Tingle charges a hefty price of 398 Rupees per chart, totaling to 3,184 for every chart. In the Wii U release, Link only needs to pay 1,194 Rupees in total due to there only being three Treasure Charts. With the second Wallet upgrade, Link can carry enough Rupees to pay Tingle upfront per each chart.
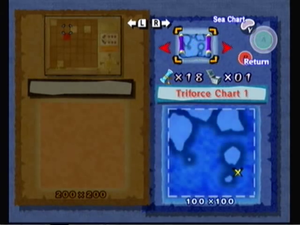
After having Tingle decipher a Triforce Chart, the player can open the Maps menu, access the Charts submenu, and press ![]() to open each individual charts that Tingle has deciphered. Each Triforce Chart has a 100 x 100 view, with a yellow X representing the Triforce Shard's location on a vague, zoomed in view of the chart. If Link and the King of Red Lions are within range of a Triforce Shard, their presence is represented by a yellow triangle on the corresponding Triforce Chart; the triangle is pointing in the direction that Link and the King of Red Lions are facing. After Link obtains a Triforce Shard, it is marked off by a red circle on the corresponding Triforce Chart.
to open each individual charts that Tingle has deciphered. Each Triforce Chart has a 100 x 100 view, with a yellow X representing the Triforce Shard's location on a vague, zoomed in view of the chart. If Link and the King of Red Lions are within range of a Triforce Shard, their presence is represented by a yellow triangle on the corresponding Triforce Chart; the triangle is pointing in the direction that Link and the King of Red Lions are facing. After Link obtains a Triforce Shard, it is marked off by a red circle on the corresponding Triforce Chart.
Locations[edit]
The IN-credible Chart reveals the island in which each Triforce Chart is located on. Most locations involve Link having to obtain a Triforce Chart by standing on a blue wind emblem and performing the Wind's Requiem, which causes a large red Treasure Chest to spawn on a circular Triforce emblem on the floor. Most of the Triforce Charts appear on an island in the "E" row of the Great Sea chart.
In The Legend of Zelda: Wind Waker HD, only Triforce Charts 1, 3, and 5 return, and the five Triforce Shards corresponding to each of their Triforce Charts were relocated in their place.
Even though the Triforce Charts are numbered, Link can still obtain them in any order.
| No. | Island | Location |
|---|---|---|
| 1 | E2 - Islet of Steel | Link must destroy the Warships and then enter inside the location, which only consists of a direct path leading to the first Triforce Chart's location. |
| 2 | E5 - Private Oasis | After giving 20 Joy Pendants to Mrs. Marie, Link earns the Cabana Deed, allowing him to enter the cabana. There, he must use the Grappling Hook on a ceiling pole, which puts out the fireplace and reveals a passage into a maze below. Link can obtain the second Triforce Chart at the end of the maze (or Triforce Shard in Wind Waker HD). |
| 3 | E7 - Bird's Peak Rock | With a Hyoi Pear, the player can take control of a seagull, who must fly into five crystals hidden in each of the five nests. By doing this, the seagull causes a caged door to open below. This leads into a small cave containing the third Triforce Chart (or second in Wind Waker HD). |
| 4 | Ghost Ship | With the Ghost Ship Chart, Link can locate and enter into the Ghost Ship, which is at a random location in the Great Sea. Inside the ship, Link must battle and defeat some enemies. After doing so, Link must climb up a ladder and into a room with a Treasure Chest containing fourth Triforce Chart (or Triforce Shard in Wind Waker HD). |
| 5 | E1 - Needle Rock Island | Here, Link must sink a golden Warship while riding on the King of Red Lions. By doing so, the Warship drops a Treasure Chest in the water. Link must go to the exact location of the Warship's defeat and use the Grappling Hook to unearth the sunken Treasure Chest containing the fifth Triforce Chart (or third in Wind Waker HD). |
| 6 | G2 - Outset Island | Link must enter the Savage Labyrinth where he must continue fighting enemies until reaching the 30th bottom floor. On this floor, Link can perform the Wind's Requiem on a blue emblem to summon a Treasure Chest containing the sixth Triforce Chart (or Triforce Shard in Wind Waker HD). |
| 7 | E3 - Stone Watcher Island | Using the Power Bracelet, Link must lift a large head-shaped rock and enter below. Here he must battle various strong enemies in different rooms, including the entrance area. After doing so, Link must enter into a room, located straight across from the door where Link entered the area, and perform the Wind's Requiem to obtain the seven Triforce Chart (or Triforce Shard in Wind Waker HD). |
| 8 | A7 - Overlook Island | On the island, Link must use the Hookshot to grapple between palm trees to move between the thin, tall structures. After grappling the fifth one, Link must move down into a hole below. The underground area is very similar to Stone Watcher Island's, as Link's objective is to defeat the enemies in every room; the enemies are more powerful than the ones fought at Stone Watcher Island. After defeating every enemy, Link can enter the room straight across from the entrance door. Inside, Link must play the Wind's Requiem and then open the Treasure Chest for the eighth and final Triforce Chart (or Triforce Shard in Wind Waker HD). |