| Don't like the ads? Then create an account! Users with accounts have more options than anonymous users. |
Difference between revisions of "Gallery:Zelda's Adventure"
From Triforce Wiki, a The Legend of Zelda wiki
Jump to navigationJump to search
(Added props) |
(→Enemies: Filled this up) |
||
| Line 13: | Line 13: | ||
===Enemies=== | ===Enemies=== | ||
<gallery> | <gallery> | ||
ZA Alligaroo.png|[[Alligaroo]] | |||
ZA Bat.png|[[Bat (Zelda's Adventure)|Bat]] | ZA Bat.png|[[Bat (Zelda's Adventure)|Bat]] | ||
ZA Blacksmith.png|[[Blacksmith (enemy)|Blacksmith]] | ZA Blacksmith.png|[[Blacksmith (enemy)|Blacksmith]] | ||
ZA Trap.png|[[Trap|Blade Trap]] | ZA Trap.png|[[Trap|Blade Trap]] | ||
ZA Bolla.png|[[Bolla]] | ZA Bolla.png|[[Bolla]] | ||
ZA Bounder.png|[[Bounder]] | |||
ZA Cactorok.png|[[Cactorok]] | |||
ZA Crockarock.png|[[Crockarock]] | ZA Crockarock.png|[[Crockarock]] | ||
ZA crystal shard.png|[[Crystal shard]] | |||
ZA Deeler.png|[[Deeler]] | |||
ZA Dolomite.png|[[Dolomite]] | |||
ZA Dragonfly.png|[[Dragonfly]] | ZA Dragonfly.png|[[Dragonfly]] | ||
ZA fireball.png|[[Fireball]] | |||
ZA Firefly.png|[[Firefly (enemy)|Firefly]] | ZA Firefly.png|[[Firefly (enemy)|Firefly]] | ||
ZA giant squid.png|[[Giant squid]] | |||
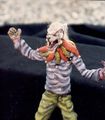
ZA Gibdo.png|[[Gibdo]] | ZA Gibdo.png|[[Gibdo]] | ||
ZA Goriya.png|[[Goriya]] | ZA Goriya.png|[[Goriya]] | ||
ZA invisible man.png|[[Invisible man]] | |||
ZA Iron Knuckle.png|[[Iron Knuckle]] | ZA Iron Knuckle.png|[[Iron Knuckle]] | ||
ZA Jack.png|[[Jack]] | ZA Jack.png|[[Jack]] | ||
ZA Jackaroo.png|[[Jackaroo]] | |||
ZA Kannis.png|[[Kannis]] | ZA Kannis.png|[[Kannis]] | ||
ZA Leever.png|[[Leever]] | |||
ZA Locassin.png|[[Loccasin]] | ZA Locassin.png|[[Loccasin]] | ||
ZA Lowder.png|[[Lowder]] | |||
ZA Mardleg.png|[[Mardleg]] | |||
ZA Mobie.png|[[Moby|Mobie]] | |||
ZA Mobilin.png|[[Moblin|Mobilin]] | |||
ZA Molluska.png|[[Molluska]] | ZA Molluska.png|[[Molluska]] | ||
ZA Mongchip.png|[[Mongchip]] | |||
ZA Octorok.png|[[Octorok]] | |||
ZA Patra.png|[[Patra]] | ZA Patra.png|[[Patra]] | ||
ZA Peahat.png|[[Peahat]] | |||
ZA pickpocket.png|[[Pickpocket]] | ZA pickpocket.png|[[Pickpocket]] | ||
ZA Pols Voice.png|[[Pols Voice]] | ZA Pols Voice.png|[[Pols Voice]] | ||
ZA Puffer.png|[[Puffer]] | |||
ZA ray.png|[[Ray]] | |||
ZA Romraven Desert.png|[[Romraven]] | |||
ZA Romraven Destiny.png|Romraven | |||
ZA Romraven Fire.png|Romraven | |||
ZA Sea Eagle.png|[[Sea Eagle]] | |||
ZA Sea Zola.png|[[Zora|Sea Zola]] | |||
ZA Skora.png|[[Skora]] | |||
ZA snake.png|[[Snake (Zelda's Adventure)|Snake]] | ZA snake.png|[[Snake (Zelda's Adventure)|Snake]] | ||
ZA spear.png|[[Spear]] | |||
ZA Squibber.png|[[Squibber]] | |||
ZA Stalfos.png|[[Stalfos]] | ZA Stalfos.png|[[Stalfos]] | ||
ZA Swamp Zola.png|[[Zora|Swamp Zola]] | |||
ZA Tektite red.png|[[Tektite]] | ZA Tektite red.png|[[Tektite]] | ||
ZA Tektite blue.png|Tektite | |||
ZA Tornado.png|[[Cyclone|Tornado]] | |||
ZA Tumblebot.png|[[Tumblebot]] | |||
ZA turtle.png|[[Turtle (Zelda's Adventure)|Turtle]] | |||
ZA Vire.png|[[Vire]] | ZA Vire.png|[[Vire]] | ||
ZA Volta.png|[[Volta]] | ZA Volta.png|[[Volta]] | ||
ZA Wall Master.png|[[Wallmaster (The Legend of Zelda: A Link to the Past)|Wall Master]] | ZA Wall Master.png|[[Wallmaster (The Legend of Zelda: A Link to the Past)|Wall Master]] | ||
ZA waterspout.png|[[Cyclone|Waterspout]] | |||
ZA Wizzrobe.png|[[Wizzrobe]] | |||
ZA Zol.png|[[Zol]] | ZA Zol.png|[[Zol]] | ||
</gallery> | </gallery> | ||
Revision as of 05:04, April 28, 2021
This is a gallery of images pertaining to Zelda's Adventure.
Sprites
Characters


Enemies

Romraven

Romraven

Tektite


Minibosses

Sardak

Sardak

Knight

Knight


Bosses


Maps
- ZA Forest of Albon map.png
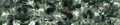
Sea


Base props
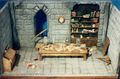
Gaspra's study miniature
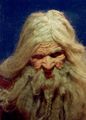
Gaspra prosthetic mask

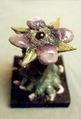
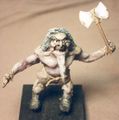
The goblin miniature
The Peahat miniature

The Octorok miniature
The Mongchip miniature
The Pasquinade miniature
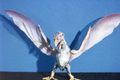
The Aviana miniature
The Warbane miniature
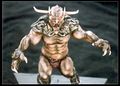
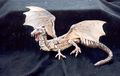
The Gannon miniature

Shelves of miniatures
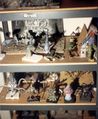
Shelf of miniatures
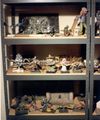
Shelf of miniatures

Shelf of miniatures


Miscellaneous

Box art
