| Don't like the ads? Then create an account! Users with accounts have more options than anonymous users. |
Difference between revisions of "Gallery:The Legend of Zelda: Majora's Mask 3D"
From Triforce Wiki, a The Legend of Zelda wiki
Jump to navigationJump to search
(→Sprites: Note that while many of these resemble their OoT3D counterparts the dithering is different) |
|||
| Line 95: | Line 95: | ||
MM3D icon Magic Mushroom.png|[[Magic Mushroom]] | MM3D icon Magic Mushroom.png|[[Magic Mushroom]] | ||
MM3D icon Map.png|[[Map]] | MM3D icon Map.png|[[Map]] | ||
MM3D icon Milk full.png|[[Milk]] | MM3D icon Milk full.png|[[Milk]] / [[Mystery Milk]] | ||
MM3D icon Milk half.png|Milk | MM3D icon Milk half.png|Milk | ||
MM3D icon Mirror Shield.png|[[Mirror Shield]] | MM3D icon Mirror Shield.png|[[Mirror Shield]] | ||
Latest revision as of 03:53, March 19, 2023
It has been requested that additional images be uploaded for this article. Remove this only when the image(s) have been uploaded for this article.
This is a gallery pertaining to The Legend of Zelda: Majora's Mask 3D. For images reused from the original, see Gallery:The Legend of Zelda: Majora's Mask.
Artwork[edit]
Major characters[edit]
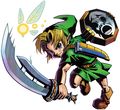
Link and Tatl


Supporting characters[edit]


Miscellaneous[edit]

Map of Termina

Graphics[edit]
Sprites[edit]
Item icons[edit]

Hero's Bow with a Fire Arrow

Hero's Bow with an Ice Arrow

Hero's Bow with a Light Arrow

Milk
Masks[edit]
Data-rendered models[edit]


Screenshots[edit]
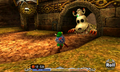
Captain Keeta asleep
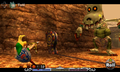
Link fighting Keeta


Miscellaneous[edit]

2016 nengajō for Nintendo Dream made by developers of the game
