| Don't like the ads? Then create an account! Users with accounts have more options than anonymous users. |
Difference between revisions of "Gallery:The Legend of Zelda: Ocarina of Time 3D"
From Triforce Wiki, a The Legend of Zelda wiki
Jump to navigationJump to search
(→Enemies: Up through Forest Temple and Bottom of the Well enemies present in noclip) |
(→Enemies: All the generic enemies and minibosses I can get from noclip as of right now (though some minor obstacles are still there)) |
||
| Line 67: | Line 67: | ||
===Enemies=== | ===Enemies=== | ||
<gallery> | <gallery> | ||
OoT3D Anubis.png|[[Anubis]] | |||
OoT3D Armos.png|[[Armos]] | OoT3D Armos.png|[[Armos]] | ||
OoT3D Baby Dodongo.png|[[Baby Dodongo]] | OoT3D Baby Dodongo.png|[[Baby Dodongo]] | ||
| Line 72: | Line 73: | ||
OoT3D Biri.png|[[Biri]] | OoT3D Biri.png|[[Biri]] | ||
OoT3D Trap.png|[[Trap|Blade Trap]] | OoT3D Trap.png|[[Trap|Blade Trap]] | ||
OoT3D Boulder.png|[[Boulder]] | |||
OoT3D Brob.png|[[Brob]] | OoT3D Brob.png|[[Brob]] | ||
OoT3D Bubble.png|[[Bubble]] | OoT3D Bubble.png|[[Bubble]] | ||
| Line 79: | Line 81: | ||
OoT3D Deku Baba.png|[[Deku Baba]] | OoT3D Deku Baba.png|[[Deku Baba]] | ||
OoT3D Deku Scrub.png|[[Deku Scrub]] | OoT3D Deku Scrub.png|[[Deku Scrub]] | ||
OoT3D Dinolfos.png|[[Dinolfos]] | |||
OoT3D Dodongo.png|[[Dodongo]] | OoT3D Dodongo.png|[[Dodongo]] | ||
OoT3D Master.png|[[Floormaster]] | OoT3D Master.png|[[Floormaster]] / [[Wallmaster (The Legend of Zelda: A Link to the Past)|Wallmaster]] | ||
OoT3D Freezard.png|[[Freezard]] | |||
OoT3D Gerudo guard.png|[[Gerudo guard]] | |||
OoT3D Gerudo Thief.png|[[Gerudo Thief]] | |||
OoT3D Gibdo.png|[[Gibdo]] | OoT3D Gibdo.png|[[Gibdo]] | ||
OoT3D Gold Skulltula.png|[[Gold Skulltula]] | OoT3D Gold Skulltula.png|[[Gold Skulltula]] | ||
| Line 91: | Line 97: | ||
OoT3D ReDead.png|[[ReDead]] | OoT3D ReDead.png|[[ReDead]] | ||
OoT3D Skull Kid.png|[[Skull Kid]] | OoT3D Skull Kid.png|[[Skull Kid]] | ||
OoT3D Skulltula.png|[[Skulltula]] | OoT3D Skulltula.png|[[Skulltula]] / [[Walltula|Skullwalltula]] | ||
OoT3D Stalfos.png|[[Stalfos]] | OoT3D Stalfos.png|[[Stalfos]] | ||
OoT3D Stinger.png|[[Stinger]] | OoT3D Stinger.png|[[Stinger]] | ||
OoT3D Tektite.png|[[Tektite]] | OoT3D Tektite.png|[[Tektite]] | ||
OoT3D | OoT3D Torch Slug.png|[[Torch Slug]] | ||
OoT3D Wolfos.png|[[Wolfos]] | OoT3D Wolfos.png|[[Wolfos]] | ||
</gallery> | </gallery> | ||
Revision as of 21:37, October 20, 2021
It has been requested that additional images be uploaded for this article. Remove this only when the image(s) have been uploaded for this article.
A gallery of images pertaining to The Legend of Zelda: Ocarina of Time 3D.
Logos

English logo
Box art

North American box art

European box art


Artwork
Characters

Link riding Epona

Link using the Fairy Slingshot


Scenes
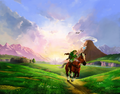
Link riding Epona across Hyrule Field
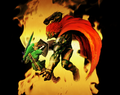
Link fighting Ganondorf


Wallpapers


Miscellaneous

Artwork used for North American box

Sprites
Item icons

Big Deku Seed Bullet Bag

Biggest Deku Seed Bullet Bag
Data-based model renders
Enemies


Screenshots
E3 2010
The E3 2010 screenshots are among the first screenshots revealed for the game. All of them show Link riding Epona.


