| Don't like the ads? Then create an account! Users with accounts have more options than anonymous users. |
Difference between revisions of "Gallery:The Legend of Zelda: Link's Awakening DX"
m |
|||
| (7 intermediate revisions by 4 users not shown) | |||
| Line 1: | Line 1: | ||
{{italic title}} | |||
A collection of images pertaining to ''[[The Legend of Zelda: Link's Awakening DX]]''. For images specifically pertaining to the original release, see [[Gallery:The Legend of Zelda: Link's Awakening]]. | A collection of images pertaining to ''[[The Legend of Zelda: Link's Awakening DX]]''. For images specifically pertaining to the original release, see [[Gallery:The Legend of Zelda: Link's Awakening]]. | ||
| Line 5: | Line 6: | ||
Zelda DX box art.png|North American cover | Zelda DX box art.png|North American cover | ||
LADX Japanese box art.jpg|Japanese cover | LADX Japanese box art.jpg|Japanese cover | ||
</gallery> | |||
==Artwork== | |||
<gallery> | |||
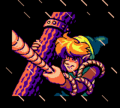
LADX Link and Marin art.jpg|[[Link]] and [[Marin]] | |||
Link LA alt artwork.png|Link | |||
Marin LA alt artwork.png|Marin | |||
</gallery> | </gallery> | ||
| Line 83: | Line 91: | ||
LADX Angler Fry.png|[[Angler Fry]] | LADX Angler Fry.png|[[Angler Fry]] | ||
LADX Anti-Fairy.png|[[Bubble|Anti-Faerie]] | LADX Anti-Fairy.png|[[Bubble|Anti-Faerie]] | ||
Anti-Kirby LADX sprite.png|[[Anti-Kirby]] | Anti-Kirby LADX sprite.png|[[Birky|Anti-Kirby]] | ||
LADX Arm-Mimic.png|[[Arm-Mimic]] | LADX Arm-Mimic.png|[[Arm-Mimic]] | ||
LADX Armos gray.png|[[Armos|Armor Statue]] | LADX Armos gray.png|[[Armos|Armor Statue]] | ||
| Line 105: | Line 113: | ||
Cukeman LADX sprite.png|[[Cukeman]] | Cukeman LADX sprite.png|[[Cukeman]] | ||
LADX Firebat.png|[[Firebat]] | LADX Firebat.png|[[Firebat]] | ||
LADX Fish enemy.png|[[ | LADX Fish enemy.png|[[Piranha|Fish]] | ||
LADX Flame Fountain.png|[[Flame Fountain]] | LADX Flame Fountain.png|[[Flame Fountain]] | ||
LADX Flying Octorok.png|[[Flying Octorok]] | LADX Flying Octorok.png|[[Flying Octorok]] | ||
| Line 198: | Line 206: | ||
LADX Hinox red.png|Hinox | LADX Hinox red.png|Hinox | ||
Grim Creeper LADX sprite.png|[[Grim Creeper]] | Grim Creeper LADX sprite.png|[[Grim Creeper]] | ||
LADX Big Keese.png|[[Big Keese]] | LADX Big Keese.png|[[Creep|Big Keese]] | ||
LADX Turtle Rock head.png|[[Turtle Rock (boss)|Turtle Rock]] | LADX Turtle Rock head.png|[[Turtle Rock (boss)|Turtle Rock]] | ||
LADX Hinox blue.png|Hinox | LADX Hinox blue.png|Hinox | ||
| Line 257: | Line 265: | ||
LADX grass woods.png|Grass | LADX grass woods.png|Grass | ||
LADX grass swamp.png|Grass | LADX grass swamp.png|Grass | ||
LADX owl statue.png|[[Owl | LADX owl statue.png|[[Owl statue]] | ||
LADX pot.png|[[Pot]] | LADX pot.png|[[Pot]] | ||
LADX pot side.png|Pot | LADX pot side.png|Pot | ||
| Line 283: | Line 291: | ||
Heart LADX GB sprite.png|[[Heart]] | Heart LADX GB sprite.png|[[Heart]] | ||
Wind Fish LADX GB sprite.png|[[Wind Fish]] | Wind Fish LADX GB sprite.png|[[Wind Fish]] | ||
</gallery> | |||
==Maps== | |||
<gallery> | |||
LADX map Koholint Island.png|[[Koholint Island]] | |||
LADX map Animal Village.png|[[Animal Village]] | |||
LADX map Cemetery.png|[[Graveyard|Cemetery]] | |||
LADX map East of the Bay.png|[[East of the Bay]] | |||
LADX map Face Shrine overworld.png|[[Face Shrine]] | |||
LADX map Goponga Swamp.png|[[Goponga Swamp]] | |||
LADX map Kanalet Castle.png|[[Kanalet Castle]] | |||
LADX map Koholint Prairie.png|[[Koholint Prairie]] | |||
LADX map Mabe Village.png|[[Mabe Village]] | |||
LADX map Martha's Bay.png|[[Martha's Bay]] | |||
LADX map Mt. Tamaranch.png|[[Mt. Tamaranch]] | |||
LADX map Mysterious Woods.png|[[Mysterious Woods]] | |||
LADX map Pothole Field.png|[[Pothole Field]] | |||
LADX map Rapids Ride.png|[[Rapids Ride]] | |||
LADX map Signpost Maze.png|[[Signpost Maze]] | |||
LADX map South of the Village.png|[[South of the Village]] | |||
LADX map Tabahl Wasteland.png|[[Tabahl Wasteland]] | |||
LADX map Tal Tal Heights.png|[[Tal Tal Heights]] | |||
LADX map Tal Tal Mountain Range.png|[[Tal Tal Mountain Range]] | |||
LADX map Toronbo Shores.png|[[Toronbo Shores]] | |||
LADX map Ukuku Prairie.png|[[Ukuku Prairie]] | |||
LADX map Yarna Desert.png|[[Yarna Desert]] | |||
</gallery> | </gallery> | ||
Latest revision as of 22:06, May 8, 2023
A collection of images pertaining to The Legend of Zelda: Link's Awakening DX. For images specifically pertaining to the original release, see Gallery:The Legend of Zelda: Link's Awakening.
Box art[edit]
North American cover

Japanese cover


Artwork[edit]

Link

Marin


Sprites[edit]
Game Boy Color[edit]
Characters[edit]

Flying Rooster

Hippo Model (Japan)

Hippo Model (international)

Owl

Quadruplet


Creatures[edit]

Bird

Fish

Fish

Frog

Mouse


Enemies[edit]

Armos Statue

Bombite

Bone Putter

Camo Goblin

Camo Goblin

Gel (big)

Iron Mask

Karakoro

Karakoro

Keese

Mega Thwomp

Moblin

Pig Warrior

Shrouded Stalfos

Soldier

Spiny Beetle

Spiny Beetle

Spiny Beetle

Stalfos

Three-of-a-Kind

Three-of-a-Kind

Three-of-a-Kind

Thwomp


Minibosses[edit]

Armos Knight

Hinox

Hinox


Bosses[edit]

Slime Eye

Slime Eel

Hot Head

Hot Head


Items[edit]
Objects[edit]

Bush

Grass

Grass

Pot

Rock

Signpost

Stone statue

Stone statue

Stone statue

Stone statue

Stone statue

Stone statue

Torch

Treasure chest

Treasure chest


Game Boy mode[edit]
Maps[edit]


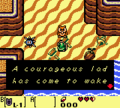
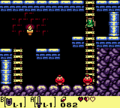
Screenshots[edit]

Title screen
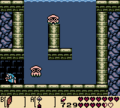
Link enduring a strong sea storm in the intro
Link's first encounter with the owl
Link in a room with Goombas in the Tail Cave

Link battling Moldorm

Link in the Bottle Grotto, in a room with two Boos

Link in a room in the Bottle Grotto with a Mask-Mimic
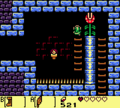
Link in the Key Cavern in a room with a Piranha Plant
Link in a room with Bloobers in the Catfish's Maw

Link in the first floor of the Eagle Tower, next to an Anti-Kirby
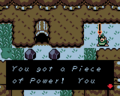
Link obtaining a Piece of Power


Miscellaneous[edit]
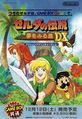
Japanese print ad
