Catfish's Maw is the fifth dungeon of The Legend of Zelda: Link's Awakening. It is accessed in the center of Martha's Bay, from the Catfish's Mouth[1], which is the head of a large catfish statue protruding from the water. Catfish's Maw takes place below the water surface, but despite this, not much water is found within the dungeon.
The Catfish's Mouth is surrounded within a circle of rocks, so Link cannot reach the dungeon without the Flippers. After obtaining the Flippers, Link must swim in between shallow rocks to the bottom-left of the Catfish's Mouth and dive. He must then swim through a short, sidescrolling underwater passage to emerge in front of the statue. In The Legend of Zelda: Link's Awakening DX, the Catfish's Mouth is blue, but in the Nintendo Switch remake, it was changed to have a gray, rocky texture. Link cannot access Catfish's Maw if the ghost is traveling with him.
The Hookshot is the main item of Catfish's Maw. Some time after Link obtains it, the first mini-boss, Master Stalfos, steals it from him after their first encounter. Link can only retrieve the Hookshot by defeating Master Stalfos on their fourth encounter. The second mini-boss is a pair of Gohmas. The boss of Catfish's Maw is Slime Eel, who Link must defeat to unlock a room with the fifth Instrument of the Sirens, the Wind Marimba.
Enemies and obstacles[edit]
Gallery[edit]
Names in other languages[edit]
| Language
|
Name
|
Meaning
|
| Japanese |
ナマズのおおぐち
Namazu no Ōguchi |
Catfish's Big Mouth
|
References[edit]
- ^ M. Arakawa. The Legend of Zelda – Link's Awakening Player's Guide. Page 58.
| The Legend of Zelda: Link's Awakening (DX) (Nintendo Switch)
|
| Characters
|
| Main and supporting
|
Link • Marin • Tarin • BowWow • Owl • Flying Rooster • Wind Fish
|
| Other
|
Bear Cub • Chef Bear • Christine • CiaoCiao • Crazy Tracy • Dampé*** • Fairy Queen* • Fisherman • Gar and Dion* • Ghost • Grandma Yahoo • Goriya • Great Fairies • Henhouse Keeper • Hippo Model • Kiki the Monkey • Li'l Devil • Madam MeowMeow • Mamasha • Mamu • Manbo • Mermaid • Mr. Write • Old Man Ulrira • Papahl • Photographer** • Quadruplets • Raccoon • Richard • Sale • Schule Donavitch • Shopkeeper • Toucan • Trendy Gamester • Walrus • Witch
|
| Species
|
Bee • Bird • Chicken • Fairy • Fish • Fox • Frog • Mini Bow-Wow • Monkey • Mouse • Rabbit • Seagull
|
| Enemies
|
| Normal enemies
|
Armos • Ball and Chain Trooper • Ballereen • Beetle • Birky • Blooper • Boarblin • Bomb Trooper • Bombite • Bonewing* • Boo • Buzz Blob • Cheep Cheep • Crow • Cukeman • Dacto • Darknut • Firebat • Ghini • Giant Ghini • Gibdo • Giant Goponga Flower • Goo Specter • Goomba • Goponga Flower • Hardhat Beetle • Helmasaur • Hollow Mimic • Hue Ball* • K.K. Sniper • Keese • Leever • Like Like • Mini Angler • Mini-Moldorm • Mini Zol • Moblin • Octorok • Pairodd • Peahat • Pincer • Piranha • Piranha Plant • Pokey • Pols Voice • Rope • Sand Crab • Sea Urchin • Shrouded Stalfos • Shy Guy • Spark • Spiny • Spiny Beetle • Stalfos • Sword Moblin • Sword Stalfos • Tektite • Three-of-a-Kind • Vire • Voidmaster • Water Tektite • Winged Octorok • Wizzrobe • Zirro • Zol • Zombie • Zora
|
| Traps and obstacles
|
Anti-Faery • Blade Trap • Boulder • Eye Guard • Face Lamp • Flame Fountain • Flying Tile • Giant Bubble • Laser • Lava • Mega Thwomp • Podoboo • Quick Sand • Shadow Link*** • Spiked Thwomp • Stone Elevator • Thwomp • Wallmaster***
|
| Minibosses
|
Armos Knight • Avalaunch* • Blaino • Dodongo Snake • Giant Buzz Blob* • Gohma • Grim Creeper and Creeps • Hinox • Hydrosoar • Lanmola • Master Stalfos • Moblin Chief • Rover • Spike Roller • Turtle Rock
|
| Bosses
|
Moldorm • Genie • Slime Eye • Angler Fish • Slime Eel • Facade • Evil Eagle • Hot Head • Shadow Nightmares (Giant Zol Shadow • Agahnim Shadow • Moldorm Shadow • Ganon Shadow • Lanmola Shadow • Death Shadow) • Hardhit Beetle*
|
| Equipment
|
| Weapons
|
Bomb • Boomerang • Bow and Arrows • Hookshot • Magic Rod • Pegasus Boots • Power Bracelet (Powerful Bracelet) • Shield (Mirror Shield) • Sword (Koholint Sword)
|
| Items
|
Blue Clothes* • Compass • Dungeon Map • Fairy • Flippers • Golden Leaf • Guardian Acorn • Heart • Heart Container • Magnifying Lens • Nightmare Key • Piece of Heart • Piece of Power • Red Clothes* • Rupee • Secret medicine • Secret Seashell • Small Key • Stone beak • Toadstool • Trading sequence items (Yoshi Doll, Ribbon, Canned food, Bananas, Stick, Honeycomb, Pineapple, Hibiscus, Goat's letter, Broom, Fishing hook, Necklace/Bra, Mermaid's Scale)
|
| Dungeon Keys
|
Tail Key • Slime Key • Angler Key • Face Key • Bird Key
|
| Instruments of the Sirens
|
Full Moon Cello • Conch Horn • Sea Lily's Bell • Surf Harp • Wind Marimba • Coral Triangle • Organ of Evening Calm • Thunder Drum
|
| Locations
|
| Koholint Island
|
Animal Village • Cemetery • East of the Bay • Goponga Swamp • Koholint Prairie • Mabe Village • Martha's Bay • Mt. Tamaranch • Mysterious Forest • Pothole Field • Rapids Ride • Shrine Waterfall • Signpost Maze • South of the Village • Tabahl Wasteland • Tal Tal Heights • Tal Tal Mountain Range • Toronbo Shores • Ukuku Prairie • Yarna Desert
|
| Dungeons
|
Level 1 - Tail Cave • Level 2 - Bottle Grotto • Level 3 - Key Cavern • Level 4 - Angler's Tunnel • Level 5 - Catfish's Maw • Level 6 - Face Shrine • Level 7 - Eagle's Tower • Level 8 - Turtle Rock • Wind Fish's Egg • Color Dungeon*
|
| Buildings
|
Crazy Tracy's Health Spa • Henhouse • House by the Bay • Manbo's Pond • Madam MeowMeow's House • Marin and Tarin's House • Old Man Ulrira's House • Quadruplets House • Raft Shop • Richard's Villa • Sale's House o' Bananas • Seashell Mansion • Telephone Booth • Town Tool Shop • Trendy Game • Under the bridge • Village Library • Weird Mr. Write • Witch's Hut
|
| Other
|
Ancient Ruins • Camera Shop** • Chamber Dungeon*** • Dampé's Shack*** • Dream Shrine • Faerie Spring • Fishing Pond • Kanalet Castle • Mermaid Statue • Moblin Cave • Warp point • Weathervane • Well
|
| * Not in the original version ** Exclusive to Link's Awakening DX *** Exclusive to the Nintendo Switch remake
|

 The Legend of Zelda: Link's Awakening DX (exterior)
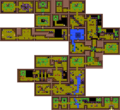 The Legend of Zelda: Link's Awakening DX (map)
