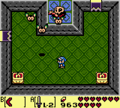
The boss battle against the Grim Creeper and Big Keese in the Switch remake
- “Bah! I'm not going to hold back! I'm going to make you wish you were never born!!”
- – Grim Creeper, The Legend of Zelda: Link's Awakening
The Grim Creeper[1] is a skeleton and a character that appears in The Legend of Zelda: Link's Awakening. In The Legend of Zelda: Link's Awakening DX, he has a black body, while in the game's Nintendo Switch remake, he has a purple body. He appears as the guardian in the third floor of the Eagle's Tower. He stands on the ledge in the room and plays a piccolo which makes Big Keeses fly into the room. When all of the Big Keeses fly into the room he stops playing and moves his piccolo forward in a thrusting position, which makes the Big Keeses attack Link. After all of the Big Keeses attack Link if not all of the Big Keeses are defeated he laughs. The first time this happens he tells Link that he can continue bringing Big Keeses if at least one is left. If the player defeats all of the Big Keeses in a set he runs off screen. In the Nintendo Switch remake, he vanishes leaving a purple mist.
The Grim Creeper reappears on top of the Eagle's Tower with two Big Keeses. Once the Evil Eagle appears he jumps on it. Once the Evil Eagle is defeated he warns Link that he and Link are in the Wind Fish's dream and the Link will be lost if the Wind Fish wakes up. The Grim Creeper and the Evil Eagle explode and a Heart Container appears.
Official descriptions
Zelda Universe
- "Link encountered the Grim Creeper while exploring the Eagle's Tower on Koholint Island. The Grim Creeper controlled six Battle Bats which he used to carry out his attacks. When his Bats were destroyed, the Grim Creeper gave up and disappeared somewhere within the Tower."
The Legend of Zelda: Link's Awakening
- Player's Guide: "The Grim Creeper controls six bats. Defeat all six before any of them leave the screen. If you don't, you'll have to fight them all again."
Quotes
- "Hey runt! You think you can take me!? All right boys, get this punk out of my face!"
- "Ha! You're gonna have to do better than that! If you leave even one alive, I can keep bringing more buddies to help! Here goes, short stuff!"
- "You dirty rat! You k-k-k... beat my brothers! You'll pay! I'll never forget you!" (Game Boy and Game Boy Color)
- "You lousy so-and-so! Those creeps were some of my best friends! You'll Pay! I'll never forget you!" (Nintendo Switch)
- "My energy... gone... I... lost! But you will be lost too, if the Wind Fish wakes! Same as me... you... are... in... his... dream..."
Gallery
The Legend of Zelda: Link's Awakening sprite
Boss fight in The Legend of Zelda: Link's Awakening DX
References
- ^ The Legend of Zelda: Link's Awakening Player's Guide, page 102.
| The Legend of Zelda: Link's Awakening (DX) (Nintendo Switch)
|
| Characters
|
| Main and supporting
|
Link • Marin • Tarin • BowWow • Owl • Flying Rooster • Wind Fish
|
| Other
|
Bear Cub • Chef Bear • Christine • CiaoCiao • Crazy Tracy • Dampé*** • Fairy Queen* • Fisherman • Gar and Dion* • Ghost • Grandma Yahoo • Goriya • Great Fairies • Henhouse Keeper • Hippo Model • Kiki the Monkey • Li'l Devil • Madam MeowMeow • Mamasha • Mamu • Manbo • Mermaid • Mr. Write • Old Man Ulrira • Papahl • Photographer** • Quadruplets • Raccoon • Richard • Sale • Schule Donavitch • Shopkeeper • Toucan • Trendy Gamester • Walrus • Witch
|
| Species
|
Bee • Bird • Chicken • Fairy • Fish • Fox • Frog • Mini Bow-Wow • Monkey • Mouse • Rabbit • Seagull
|
| Enemies
|
| Normal enemies
|
Armos • Ball and Chain Trooper • Ballereen • Beetle • Birky • Blooper • Boarblin • Bomb Trooper • Bombite • Bonewing* • Boo • Buzz Blob • Cheep Cheep • Crow • Cukeman • Dacto • Darknut • Firebat • Ghini • Giant Ghini • Gibdo • Giant Goponga Flower • Goo Specter • Goomba • Goponga Flower • Hardhat Beetle • Helmasaur • Hollow Mimic • Hue Ball* • K.K. Sniper • Keese • Leever • Like Like • Mini Angler • Mini-Moldorm • Mini Zol • Moblin • Octorok • Pairodd • Peahat • Pincer • Piranha • Piranha Plant • Pokey • Pols Voice • Rope • Sand Crab • Sea Urchin • Shrouded Stalfos • Shy Guy • Spark • Spiny • Spiny Beetle • Stalfos • Sword Moblin • Sword Stalfos • Tektite • Three-of-a-Kind • Vire • Voidmaster • Water Tektite • Winged Octorok • Wizzrobe • Zirro • Zol • Zombie • Zora
|
| Traps and obstacles
|
Anti-Faery • Blade Trap • Boulder • Eye Guard • Face Lamp • Flame Fountain • Flying Tile • Giant Bubble • Laser • Lava • Mega Thwomp • Podoboo • Quick Sand • Shadow Link*** • Spiked Thwomp • Stone Elevator • Thwomp • Wallmaster***
|
| Minibosses
|
Armos Knight • Avalaunch* • Blaino • Dodongo Snake • Giant Buzz Blob* • Gohma • Grim Creeper and Creeps • Hinox • Hydrosoar • Lanmola • Master Stalfos • Moblin Chief • Rover • Spike Roller • Turtle Rock
|
| Bosses
|
Moldorm • Genie • Slime Eye • Angler Fish • Slime Eel • Facade • Evil Eagle • Hot Head • Shadow Nightmares (Giant Zol Shadow • Agahnim Shadow • Moldorm Shadow • Ganon Shadow • Lanmola Shadow • Death Shadow) • Hardhit Beetle*
|
| Equipment
|
| Weapons
|
Bomb • Boomerang • Bow and Arrows • Hookshot • Magic Rod • Pegasus Boots • Power Bracelet (Powerful Bracelet) • Shield (Mirror Shield) • Sword (Koholint Sword)
|
| Items
|
Blue Clothes* • Compass • Dungeon Map • Fairy • Flippers • Golden Leaf • Guardian Acorn • Heart • Heart Container • Magnifying Lens • Nightmare Key • Piece of Heart • Piece of Power • Red Clothes* • Rupee • Secret medicine • Secret Seashell • Small Key • Stone beak • Toadstool • Trading sequence items (Yoshi Doll, Ribbon, Canned food, Bananas, Stick, Honeycomb, Pineapple, Hibiscus, Goat's letter, Broom, Fishing hook, Necklace/Bra, Mermaid's Scale)
|
| Dungeon Keys
|
Tail Key • Slime Key • Angler Key • Face Key • Bird Key
|
| Instruments of the Sirens
|
Full Moon Cello • Conch Horn • Sea Lily's Bell • Surf Harp • Wind Marimba • Coral Triangle • Organ of Evening Calm • Thunder Drum
|
| Locations
|
| Koholint Island
|
Animal Village • Cemetery • East of the Bay • Goponga Swamp • Koholint Prairie • Mabe Village • Martha's Bay • Mt. Tamaranch • Mysterious Forest • Pothole Field • Rapids Ride • Shrine Waterfall • Signpost Maze • South of the Village • Tabahl Wasteland • Tal Tal Heights • Tal Tal Mountain Range • Toronbo Shores • Ukuku Prairie • Yarna Desert
|
| Dungeons
|
Level 1 - Tail Cave • Level 2 - Bottle Grotto • Level 3 - Key Cavern • Level 4 - Angler's Tunnel • Level 5 - Catfish's Maw • Level 6 - Face Shrine • Level 7 - Eagle's Tower • Level 8 - Turtle Rock • Wind Fish's Egg • Color Dungeon*
|
| Buildings
|
Crazy Tracy's Health Spa • Henhouse • House by the Bay • Manbo's Pond • Madam MeowMeow's House • Marin and Tarin's House • Old Man Ulrira's House • Quadruplets House • Raft Shop • Richard's Villa • Sale's House o' Bananas • Seashell Mansion • Telephone Booth • Town Tool Shop • Trendy Game • Under the bridge • Village Library • Weird Mr. Write • Witch's Hut
|
| Other
|
Ancient Ruins • Camera Shop** • Chamber Dungeon*** • Dampé's Shack*** • Dream Shrine • Faerie Spring • Fishing Pond • Kanalet Castle • Mermaid Statue • Moblin Cave • Warp point • Weathervane • Well
|
| * Not in the original version ** Exclusive to Link's Awakening DX *** Exclusive to the Nintendo Switch remake
|