| Don't like the ads? Then create an account! Users with accounts have more options than anonymous users. |
Difference between revisions of "The Legend of Zelda: Four Swords"
(fix) |
(Expansion) |
||
| Line 4: | Line 4: | ||
In 2011, the game received a remake as a DSiWare title, ''[[The Legend of Zelda: Four Swords Anniversary Edition]]''. Its most notable difference is the inclusion of a single player option. | In 2011, the game received a remake as a DSiWare title, ''[[The Legend of Zelda: Four Swords Anniversary Edition]]''. Its most notable difference is the inclusion of a single player option. | ||
==Plot== | |||
Many years before the game's plot, the evil wind mage [[Vaati]] terrorized the land of [[Hyrule]], but was seal within the [[Four Sword]]. In the present, [[Link]] and [[Princess Zelda]] travel to the [[Chamber of the Four Sword]] to check on the seal, but an already-escaped Vaati kidnaps the princess. Link draws the Four Sword, splitting him into multiple copies of himself, and are led by a trio of [[Fairy|fairies]] to seek out the three [[Great Fairy|Great Fairies]] for the [[key]]s to [[Palave of Winds|Vaati's Palace]], where they must defeat him. | |||
==Characters== | |||
{|class=wikitable | |||
!Sprite | |||
!Name | |||
!Description | |||
|- | |||
|align=center|[[File:FS Link green.png]] [[File:FS Link red.png]] [[File:FS Link blue.png]] [[File:FS Link purple.png]] | |||
|[[Link]]s | |||
| | |||
|- | |||
|align=center|[[File:FS Zelda.png]] | |||
|[[Princess Zelda]] | |||
| | |||
|- | |||
|align=center|[[File:FS Stray Fairy green.png]] [[File:FS Stray Fairy red.png]] [[File:FS Stray Fairy blue.png]] [[File:FS Stray Fairy purpink.png]] [[File:FS Stray Fairy yellow.png]] | |||
|[[Stray Fairy|Stray Fairies]] | |||
| | |||
|- | |||
|align=center| | |||
|[[Great Fairy|Great Fairies]] | |||
| | |||
|} | |||
==Enemies and minibosses== | |||
{|class=wikitable | |||
!Sprite | |||
!Name | |||
!Description | |||
|- | |||
|align=center|[[File:FS Armos.png]] [[File:FS Armos inactive.png]] | |||
|[[Armos]] | |||
| | |||
|- | |||
|align=center|[[File:FS Bomb Soldier active.png]] | |||
|[[Bob-omb|Bomb Soldier]] | |||
| | |||
|- | |||
|align=center|[[File:FS Bubbling Lava.png]] [[File:FS Bubbling Lava small.png]] | |||
|[[Podoboo|Bubbling Lava]] | |||
| | |||
|- | |||
|align=center|[[File:FS Bulbul.png]] | |||
|[[Bulbul]] | |||
| | |||
|- | |||
|align=center|[[File:FS Darknut.png]] | |||
|[[Darknut]] | |||
| | |||
|- | |||
|align=center|[[File:FS Fin Piranha.png]] | |||
|[[Piranha|Fin Piranha]] | |||
| | |||
|- | |||
|align=center|[[File:FS Gel.png]] | |||
|[[Gel]] | |||
| | |||
|- | |||
|align=center|[[File:FS Ghini.png]] | |||
|[[Ghini]] | |||
| | |||
|- | |||
|align=center|[[File:FS Gibdo.png]] | |||
|[[Gibdo]] | |||
| | |||
|- | |||
|align=center|[[File:FS Hadie bush.png]] [[File:FS Hadie exposed.png]] | |||
|[[Spiny Beetle|Hadie]] | |||
| | |||
|- | |||
|align=center|[[File:FS Hikkun.png]] | |||
|[[Hikkun]] | |||
| | |||
|- | |||
|align=center|[[File:FS Hiproop masked.png]] [[File:FS Hiproop unmasked.png]] | |||
|[[Helmasaur|Hiproop]] | |||
| | |||
|- | |||
|align=center|[[File:FS Igor.png]] | |||
|[[Eyegore|Igor]] | |||
| | |||
|- | |||
|align=center|[[File:FS Iron Ball Soldier.png]] | |||
|[[Ball and Chain Trooper|Iron Ball Soldier]] | |||
| | |||
|- | |||
|align=center|[[File:FS Keese.png]] | |||
|[[Keese]] | |||
| | |||
|- | |||
|align=center|[[File:FS Moblin bow.png]] [[File:FS Moblin spear.png]] | |||
|[[Moblin]] | |||
| | |||
|- | |||
|align=center|[[File:FS Nokken.png]] | |||
|[[Nokken]] | |||
| | |||
|- | |||
|align=center|[[File:FS Octorok.png]] | |||
|[[Octorok]] | |||
| | |||
|- | |||
|align=center|[[File:FS Pseudo Rupee green.png]] [[File:FS Pseudo Rupee blue.png]] [[File:FS Pseudo Rupee red.png]] | |||
|[[Rupee Like|Pseudo Rupee]] | |||
| | |||
|- | |||
|align=center|[[File:FS Rope.png]] | |||
|[[Rope|Roope]] | |||
| | |||
|- | |||
|align=center| | |||
|[[Rupee Wraith]] | |||
| | |||
|- | |||
|align=center|[[File:FS Stalfos.png]] | |||
|[[Stalchild|Stalfos]] | |||
| | |||
|- | |||
|align=center|[[File:FS Tail.png]] | |||
|[[Moldorm (The Legend of Zelda: A Link to the Past)|Tail]] | |||
| | |||
|- | |||
|align=center|[[File:FS Tektite.png]] | |||
|[[Tektite]] | |||
| | |||
|- | |||
|align=center|[[File:FS Togezo.png]] | |||
|[[Spiny|Togezo]] | |||
| | |||
|- | |||
|align=center|[[File:FS Wisp red.png]] [[File:FS Wisp blue.png]] | |||
|[[Wisp]] | |||
| | |||
|- | |||
|align=center|[[File:FS Wizrobe.png]] | |||
|[[Wizzrobe|Wizrobe]] | |||
| | |||
|- | |||
|align=center|[[File:FS Wizrobe fire.png]] | |||
|[[Fire Wizzrobe|Wizrobe, Fire]] | |||
| | |||
|- | |||
|align=center|[[File:FS Wizrobe ice.png]] | |||
|[[Ice Wizzrobe|Wizrobe, Ice]] | |||
| | |||
|- | |||
|align=center|[[File:FS Zol.png]] | |||
|[[Zol]] | |||
| | |||
|} | |||
===Obstacles=== | |||
{|class=wikitable | |||
!Sprite | |||
!Name | |||
!Description | |||
|- | |||
|align=center|[[File:FS Blazing Watch Tower.png]] | |||
|[[Blazing Watch Tower]] | |||
| | |||
|- | |||
|align=center|[[File:FS Bombarossa.png]] | |||
|[[Bombarossa]] | |||
| | |||
|- | |||
|align=center|[[File:FS Chaser.png]] | |||
|[[Chaser]] | |||
| | |||
|- | |||
|align=center|[[File:FS Flying Floor Tile.png]] | |||
|[[Flying Floor]] | |||
| | |||
|- | |||
|align=center| | |||
|[[Rupoor]] | |||
| | |||
|- | |||
|align=center|[[File:FS Trap blue.png]] [[File:FS Trap.png]] [[File:FS Trap green.png]] | |||
|[[Trap]] | |||
| | |||
|} | |||
==Bosses== | |||
{|class="wikitable sortable" | |||
!class=unsortable|Sprite | |||
!Name | |||
!class=unsortable|Location | |||
!class=unsortable|Description | |||
|- | |||
|align=center|[[File:FS Manhandla.png]] | |||
|[[Manhandla (The Legend of Zelda: Four Swords)|Manhandla]] | |||
|[[Sea of Trees]] | |||
| | |||
|- | |||
|align=center|[[File:FS Dera Zol 1.png]] [[File:FS Dera Zol 2.png]] [[File:FS Dera Zol 3.png]] | |||
|[[Dera Zol]] | |||
|[[Talus Caves]] | |||
| | |||
|- | |||
|align=center|[[File:FS Goen 1.png]] [[File:FS Goen 2.png]] [[File:FS Goen 3.png]] | |||
|[[Gōen]] | |||
|[[Death Mountain]] | |||
| | |||
|- | |||
|align=center|[[File:FS Vaati statue.png]] [[File:FS Vaati.png]] | |||
|[[Vaati]] | |||
|[[Palace of Winds|Vaati's Palace]] | |||
| | |||
|} | |||
==Gallery== | |||
{{main-gallery}} | |||
<gallery> | |||
FS main group art.jpg|Group artwork of the four Links | |||
FS Great Fairies art.jpg|The [[Great Fairy|Great Fairies]] | |||
FS Vaati art.jpg|[[Vaati]] | |||
FS Fairy forest.png|A [[fairy]] of forest | |||
FS Dera Zol final.png|[[Dera Zol]]'s final stage | |||
</gallery> | |||
{{stub}} | {{stub}} | ||
Revision as of 06:50, December 17, 2021
The Legend of Zelda: Four Swords is the ninth mainline entry in The Legend of Zelda series. The game was originally released for the Game Boy Advance on the compilation title, The Legend of Zelda: A Link to the Past/Four Swords in 2002 in which it was included with a re-release of The Legend of Zelda: A Link to the Past. The game is notable for being the first mainline entry to have a multiplayer focus and no single player option, and allows for up to four players to simultaneously play the game by using the Game Boy Advance Link Cable.
In 2011, the game received a remake as a DSiWare title, The Legend of Zelda: Four Swords Anniversary Edition. Its most notable difference is the inclusion of a single player option.
Plot
Many years before the game's plot, the evil wind mage Vaati terrorized the land of Hyrule, but was seal within the Four Sword. In the present, Link and Princess Zelda travel to the Chamber of the Four Sword to check on the seal, but an already-escaped Vaati kidnaps the princess. Link draws the Four Sword, splitting him into multiple copies of himself, and are led by a trio of fairies to seek out the three Great Fairies for the keys to Vaati's Palace, where they must defeat him.
Characters
| Sprite | Name | Description |
|---|---|---|
| Links | ||
| Princess Zelda | ||
| Stray Fairies | ||
| Great Fairies |
Enemies and minibosses
Obstacles
| Sprite | Name | Description |
|---|---|---|
| Blazing Watch Tower | ||
| Bombarossa | ||
| Chaser | ||
| Flying Floor | ||
| Rupoor | ||
| Trap |
Bosses
| Sprite | Name | Location | Description |
|---|---|---|---|

|
Manhandla | Sea of Trees | |
| Dera Zol | Talus Caves | ||

|
Gōen | Death Mountain | |
| Vaati | Vaati's Palace |
Gallery
- For this subject's image gallery, see Gallery:The Legend of Zelda: Four Swords.
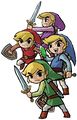
Group artwork of the four Links
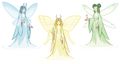
The Great Fairies

A fairy of forest

Dera Zol's final stage


 This article is a stub. You can help Triforce Wiki by expanding it.